In his tutorial titled “Creating a Stunning Day to Night Hyperlapse Tutorial with After Effects and Premiere Pro,” videographer Ryan Shirley shares his techniques for capturing and editing captivating day to night hyperlapses. Using a Sony A7sii camera with a 14mm Rokinon lens, Shirley emphasizes the importance of maintaining the same focal point and path throughout the hyperlapse. He takes viewers through the process of importing and stabilizing the footage in After Effects, and offers tips for refining the transition between day and night. To see more of Shirley’s tutorials and time lapses, he encourages viewers to subscribe to his channel. Get ready to take your hyperlapse game to the next level with this informative and friendly tutorial.
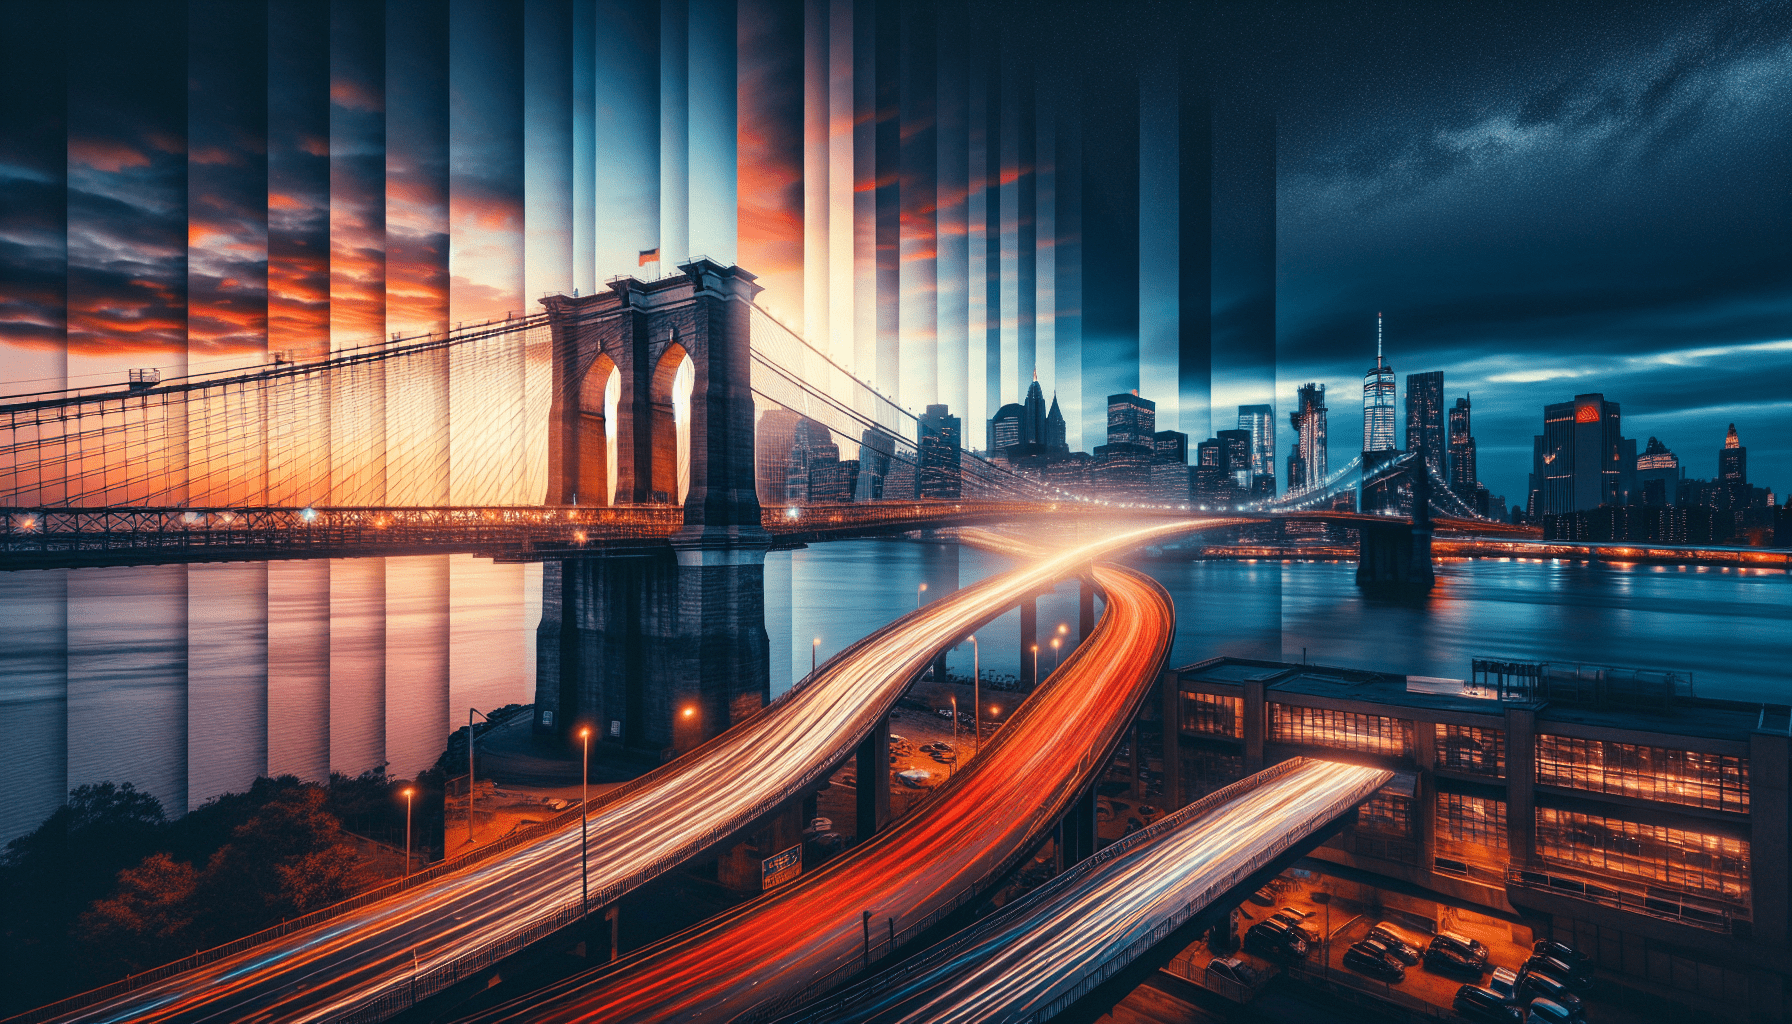
In this engaging tutorial, Ryan Shirley introduces viewers to the world of day to night hyperlapse photography. As he explores the iconic Brooklyn Bridge in New York City, he demonstrates the step-by-step process of capturing and editing these stunning shots. Utilizing the power of After Effects and Premiere Pro, Shirley takes viewers through the technical aspects of importing, stabilizing, and refining the footage. With his friendly and approachable style, Shirley creates an inviting atmosphere for viewers to learn and expand their videography skills. So grab your camera and get ready to master the art of day to night hyperlapse with this helpful tutorial.
Tutorial: Creating a Stunning Day to Night Hyperlapse with After Effects and Premiere Pro
Choosing the Right Equipment
To create a stunning day to night hyperlapse, it is important to start with the right equipment. For this tutorial, the filmmaker used a Sony A7sii with a 14mm Rokinon lens. This combination allowed for high-quality footage and wide-angle shots. When choosing your equipment, consider the capabilities of your camera and lens to ensure you capture the best footage possible.
Planning and Preparation
Before heading out to capture the hyperlapse footage, it is crucial to plan and prepare. Start by scouting locations and identifying interesting subjects or landmarks that will make your hyperlapse visually appealing. It is also important to consider the path you will take while capturing the hyperlapse and make sure it remains consistent throughout the entire process. This will ensure a smooth and continuous motion in your final hyperlapse.
Capturing the Hyperlapse Footage
Now that you have your equipment and a plan in place, it’s time to capture the hyperlapse footage. Find a suitable starting point, preferably with a clear path and a captivating subject in the frame. Set up your camera and ensure it is stable throughout the entire hyperlapse. Take a series of photos or videos at consistent intervals as you move along the predetermined path. Remember to maintain the same focal point and keep the camera level to achieve a smooth and professional-looking hyperlapse.
Importing the Footage into After Effects
Once you have captured the hyperlapse footage, it’s time to import it into After Effects for further editing. Start by opening After Effects and creating a new project. Then, import the photos or videos you captured during the hyperlapse. To do this, highlight all the files and select the option to import as a JPEG sequence. This will import all the footage as a video sequence.
Creating the Hyperlapse in After Effects
With the footage imported, you can now start creating the hyperlapse in After Effects. Drag the imported footage into a composition and adjust the settings as needed. You can also add effects, transitions, or any other elements to enhance the hyperlapse. After Effects provides a wide range of tools and features that allow you to customize and create a unique hyperlapse.
Stabilizing the Hyperlapse with Warp Stabilizer
After creating the hyperlapse, it’s important to stabilize the footage to remove any shakiness or unwanted movement. One way to achieve this is by using the Warp Stabilizer tool in After Effects. Nest the hyperlapse composition, then apply the Warp Stabilizer effect to the nested composition. This effect will analyze and stabilize the footage, resulting in a smoother and more professional-looking hyperlapse.
Adjusting the Transition from Day to Night
To make the day to night transition in your hyperlapse seamless, you can make adjustments using masking and blending techniques. Find a spot in the hyperlapse footage where a visual element, such as a landmark or light source, can serve as a reference point for the transition. Create a mask around this element and adjust the position and feathering to blend the day and night footage together. Keyframe the mask to gradually reveal the night footage as the day footage fades away.
Exporting and Rendering the Hyperlapse
Once you are satisfied with the hyperlapse in After Effects, it’s time to export and render the final video. Go to the composition tab and select Add to Render Queue. In the output module settings, choose the desired format and quality for your hyperlapse. Then, select the output location and click render. After Effects will process and export the hyperlapse video according to your settings.
Importing the Rendered Hyperlapse into Premiere Pro
With the hyperlapse video rendered, it can now be imported into Premiere Pro for further editing and final touches. Open Premiere Pro and create a new project. Import the rendered hyperlapse video and drag it into the timeline. You can now use Premiere Pro’s editing tools, such as adding transitions, adjusting colors, or applying effects, to enhance the hyperlapse and make it more visually appealing.
Final Touches and Exporting the Final Hyperlapse
In Premiere Pro, you can make final touches and adjustments to the hyperlapse. This can include adjusting the color grading, adding text or graphics, or fine-tuning the audio. Once you are satisfied with the final result, it’s time to export the hyperlapse as a high-quality video file. Choose the desired format, resolution, and settings for your export and select the output location. Hit the export button and wait for Premiere Pro to process and export the final hyperlapse.
Conclusion
Creating a stunning day to night hyperlapse requires careful planning, the right equipment, and post-production editing skills. By following the steps outlined in this tutorial using After Effects and Premiere Pro, you can achieve professional-looking hyperlapse footage that captivates your audience. Remember to maintain the same focal point and path throughout the hyperlapse, stabilize the footage with the Warp Stabilizer tool, and refine the transition from day to night. With practice and experimentation, you can create breathtaking day to night hyperlapses that showcase the beauty of time passing. Subscribe for more tutorials and tips on videography and time-lapse techniques to continue honing your skills and creating stunning visuals. Happy hyperlapsing!